Plumbing Vent Layout
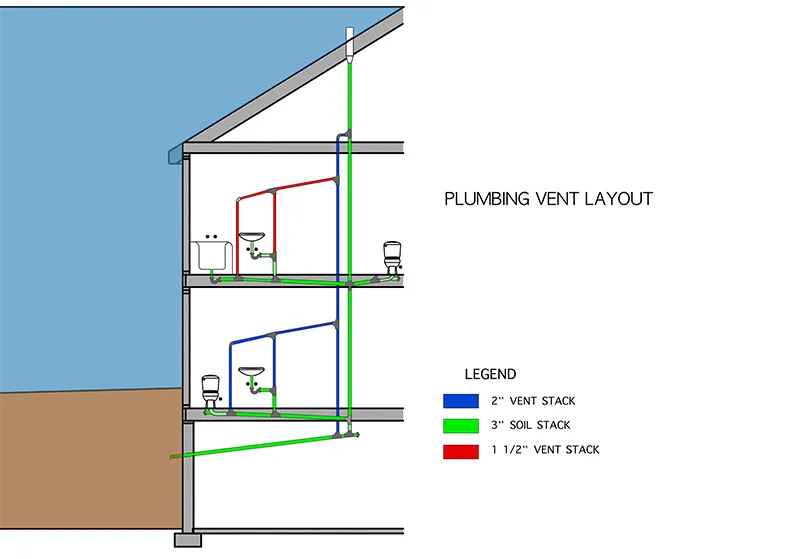
A clear plumbing vent layout is essential for any multi-story building. With ArcSite, you can easily design and document how vent stacks and soil stacks support multiple bathroom fixtures—ensuring your systems are fully functional and up to code.




Free access to over 1,200 shapes and blocks included with the ArcSite CAD app
Key features
Features of ArcSite’s Plumbing Vent Layout Template
Multi-Story Visualization
- Shows plumbing vents for multiple floors in one section view.
- Each fixture (toilet, sink, shower) is connected with accurate pipe routing.
- Displays typical locations of vent stacks as they pass through walls and ceilings.
Color-Coded Legend
- 2" Vent Stack (Blue): Ideal for grouped fixtures and main venting paths.
- 3" Soil Stack (Green): Handles wastewater from toilets and multiple fixtures.
- 1½" Vent Stack (Red): Used for individual fixture vents like sinks.
Get your free download
Trusted by the Pros. Honored for Innovation.





Key Considerations When Planning Your Vent Layout
A proper vent layout ensures fixture traps don’t siphon and sewer gases stay out of the building. Follow local code for vent pipe sizing, spacing, and termination above the roofline. Grouping fixtures on vertical stacks can simplify design and save material. Be sure to place cleanouts for maintenance, and keep vents away from windows or air intakes for safety.

What’s the difference between back venting and stack venting?
Back venting (continuous venting) uses a separate line to vent a fixture, while stack venting combines venting and draining in the same vertical stack. Shown is an example of back venting.


Plumbing & Restroom Fixtures
templates you might like



.avif)

FAQ
It’s a diagram that shows how vent pipes are routed to maintain air pressure and allow proper drainage throughout a building.
Yes, it reflects standard layouts, but should be modified to meet your local plumbing code.
Absolutely. ArcSite runs on iOS, Android, and Windows for flexible access.